本地搭建合规换脸实验服务:Python API 接口完整教程
本地搭建合规换脸实验服务:Python API 接口完整教程
先说明一点:
1 | 换脸、人脸替换、人脸生成这类技术,只应该用于本人或明确授权的素材。 |
我不会写“支持 NSFW 换脸”的教程。
原因很简单:这类能力很容易被用于非自愿色情深度伪造,风险太高,也不应该被当成普通技术教程传播。
本文写的是一个合规版本:
1 | 本地搭建一个人脸替换/图像处理实验服务,并通过 Python API 给外部程序调用。 |
它包含:
- 本地 Python 环境
- 模型服务结构
- 文件上传接口
- 任务队列
- 内容安全检查
- API Token 鉴权
- 外部程序调用示例
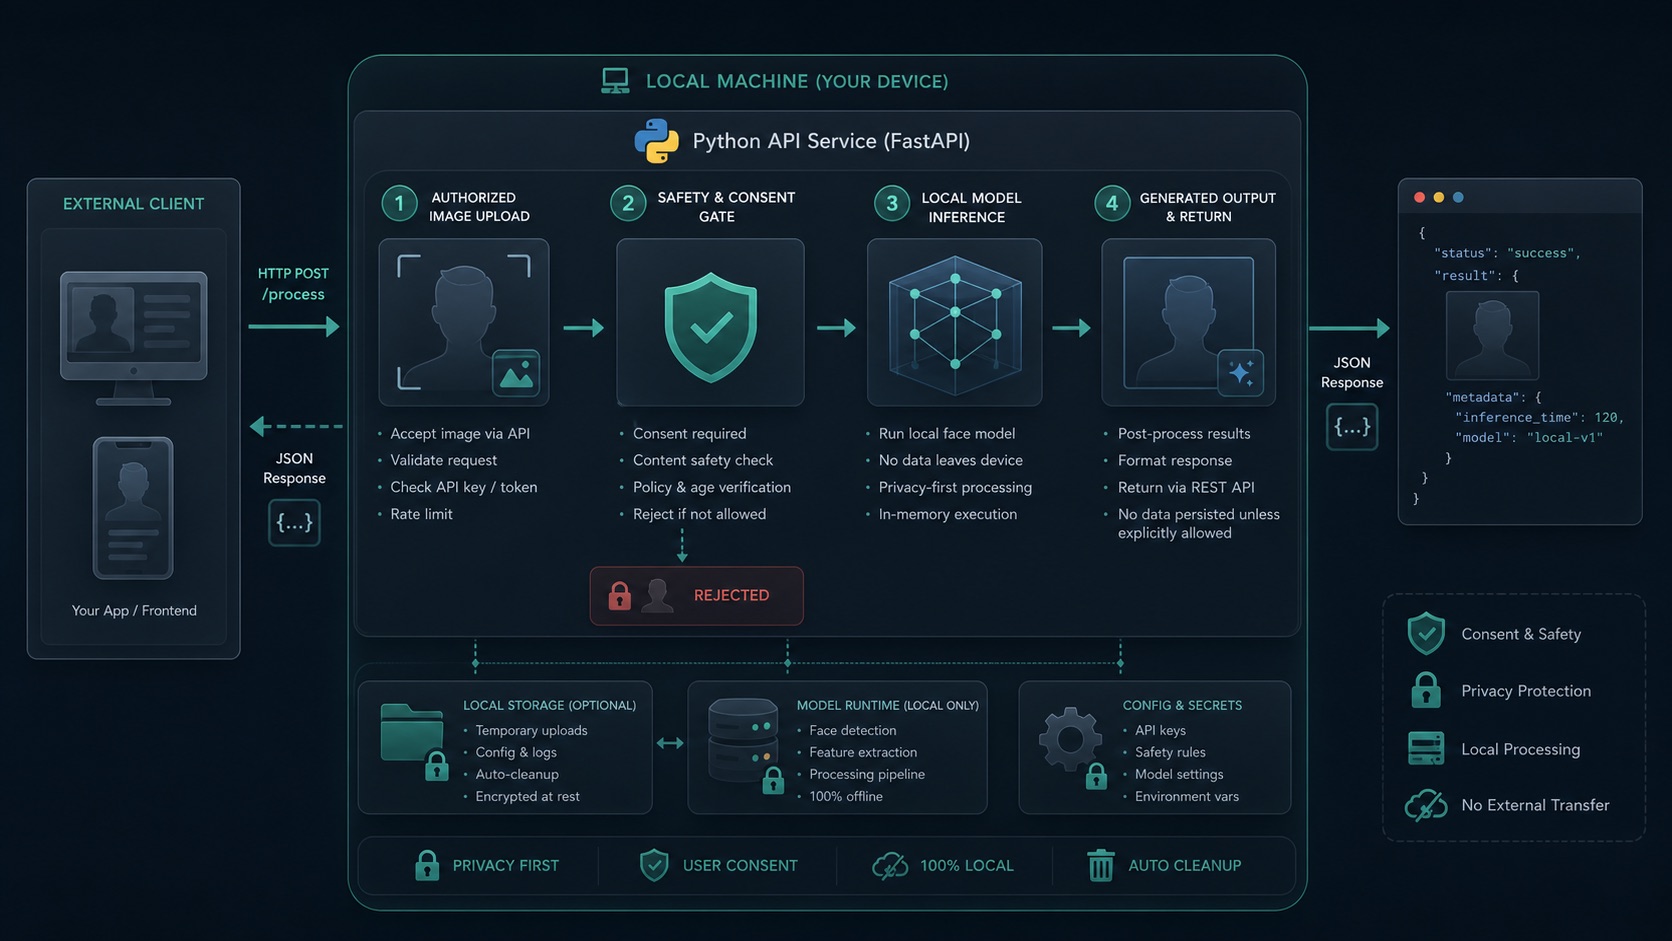
一、项目目标
我们要做的不是一个“网页玩具”,而是一个可以被其他程序调用的本地 API 服务。
最终效果类似:
1 | 外部程序 -> HTTP API -> 本地 Python 服务 -> 安全检查 -> 模型处理 -> 返回结果图片 |
接口大概长这样:
1 | POST /api/v1/face/process |
上传:
source_image:源人脸图target_image:目标图
返回:
task_idstatusresult_url
二、准备 Python 环境
建议使用 Python 3.10 或 3.11。
创建项目:
1 | mkdir local-face-api |
安装依赖:
1 | pip install fastapi uvicorn python-multipart pillow opencv-python pydantic |
如果你后面要接入自己的本地模型,可以再安装对应推理框架,例如:
1 | pip install onnxruntime |
或者:
1 | pip install torch torchvision |
具体用哪个取决于你的模型格式。
三、项目目录结构
推荐这样组织:
1 | local-face-api/ |
这里重点是把几个职责拆开:
| 文件 | 作用 |
|---|---|
main.py |
FastAPI 入口 |
security.py |
API Token 鉴权 |
safety.py |
内容安全检查 |
storage.py |
文件保存 |
processor.py |
模型处理逻辑 |
不要把所有东西都堆到 main.py。
后面维护会很痛苦。
四、配置 API Token
创建 .env:
1 | API_TOKEN=change-me-to-a-long-random-token |
写 app/config.py:
1 | import os |
实际部署时不要用默认 Token。
五、接口鉴权
写 app/security.py:
1 | from fastapi import Header, HTTPException |
外部程序调用时必须带:
1 | Authorization: Bearer your-token |
六、内容安全检查
这里我们做一个最小版本:
1 | 拒绝过大的图片 |
写 app/safety.py:
1 | from fastapi import HTTPException, UploadFile |
如果你要上线给别人用,安全检查必须更严格。
至少应该增加:
- NSFW 分类器
- 人脸授权确认
- 请求日志
- 水印
- 频率限制
- 人工审核
七、文件保存
写 app/storage.py:
1 | import os |
八、模型处理逻辑
写 app/processor.py:
1 | from PIL import Image, ImageDraw |
这里故意只写占位逻辑。
因为真正的人脸替换模型必须确认素材授权、模型许可和使用边界。
九、FastAPI 主入口
写 app/main.py:
1 | from fastapi import Depends, FastAPI, File, UploadFile |
启动服务:
1 | API_TOKEN=dev-token uvicorn app.main:app --host 0.0.0.0 --port 8000 |
访问:
1 | http://127.0.0.1:8000/docs |
可以看到 Swagger 文档。
十、外部程序调用示例
使用 curl:
1 | curl -X POST "http://127.0.0.1:8000/api/v1/face/process" \ |
使用 Python:
1 | import requests |
十一、生产环境建议
如果这个服务要长期运行,建议增加:
- 请求队列
- 任务状态表
- 日志审计
- 访问频率限制
- IP 白名单
- 内容审核模型
- 用户授权确认
- 输出图片水印
- 自动清理临时文件
如果模型推理耗时较长,不建议同步阻塞请求。
可以改成:
1 | 提交任务 -> 返回 task_id -> 后台处理 -> 查询结果 |
接口:
1 | POST /api/v1/face/tasks |
总结
本地搭建人脸处理 API 并不难。
真正难的是:
1 | 如何保证它只用于授权、合规、可审计的场景。 |
所以本文给的是一个安全边界清楚的版本:
- 本地运行
- API 调用
- Token 鉴权
- 文件上传
- 安全检查
- 模型处理占位
- 输出结果
如果你要接入真实模型,请先确认:
1 | 素材有授权 |
技术能做,不代表应该做。